Pages

Sunday, June 30, 2013

Daily Bread II: No-knead Semi-Sourdough Bread

For many years my parents made their own bread, stopping only when Mennonites started selling excellent home-made bread at the local farmer's market. Nowadays, my mother lives alone and doesn't drive, so it's not as easy to get to the market, so she really enjoyed my homemade bread when she was here for a visit.

She started musing about making bread herself again, but this is a challenge because she doesn't have a mixer with a dough hook and arthritis makes kneading bread by hand painful. I suggested a no-knead bread recipe I had come across on the Internet. However, I hadn't made it myself so I couldn't give advice on how well it worked. So this one's for you, Mom!


I followed the instructions in the Essential New York Times Cookbook, by Amanda Hessler (although I did substitute whole wheat flour for one cup of white flour).  The result was a crusty, sourdough-style bread with a coarse spongy structure and excellent flavour.

It uses very little yeast and relies on a long rising time to replace the kneading, which puts it half way to a sourdough bread. Like sourdough, the dough is very soft. In fact, using the proportions given in the recipe, I think the dough was too soft, almost a batter.

It does not contain oil or milk, so it's keeping qualities are not that great, but it's great as an accompaniment to soup, or made into croutons.

You don't have to knead the dough, but you do need to handle it. Because my dough was half way to a batter, I found a dough scraper very useful. The instructions call for using just enough flour to keep the dough from sticking, but the only way to do that is to flour the work surface, your hands, and the dough scraper very generously.

The recipe calls for you shape the dough into a ball with a seam for the second rise. This was not possible with my dough, so more flour or less liquid may be required. I should have looked at the  video  first, which  shows the consistency you really want.

For the second rise, the dough is placed on a floured tea towel. With such a soft dough, I decided to  put the dough in the tea towel into a bowl to prevent it from spreading sideways instead of upwards. This also made it easier to tip into the preheated pot for baking.

No-Knead Semi-Sourdough Bread

Adapted from the recipe created by Jim Lahey and made famous by Mark Bittman.

2 cups white flour
1 cup whole wheat flour
1/4 teaspoon instant yeast
1 1/4 teaspoon salt
1 cup plus 2 tablespoons (300 ml) water

  1. After rising 16 hours.
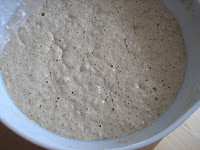
The day before you want to bake the bread, mix the dry ingredients in a bowl, then add the water. Mix together until it forms a clump, then cover with a plastic wrap and let sit at room temperature for 12-18 hours. The dough will form bubbles as the flour, encouraged by the yeast, ferments.
  2. My dough was too soft, so I used a dough scraper to turn it over. 
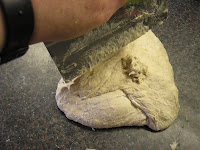
Flour a working surface and tip the dough onto it. It will be soft, tacky, and shaggy. Sprinkle more flour over the dough and fold it over itself a few times. If the dough is very soft, use a dough scraper. Let it rest for 15 minutes.
  3. I found it useful to put the dough into a bowel for its second rise.Meanwhile, cover a tea towel with flour, bran, or cornmeal. After the dough has rested, gently shape it into a ball (if you can), then transfer it to the tea towel, seam side up. Let it rise for 2 to 2.5 hours.
  4. The dough has a top-knot because I scraped dough still clinging to the tea towel.A half hour before the second rise completes, pre-heat the oven to 475, with a heavy covered pot or Pyrex casserole. (The preheating and cover of the pot are important! They will essentially form a mini-oven in which steam is released to form the crust.)
    Note: I used my cast iron cocotte, but it was a bit too big. Next time I'll try a smaller pot or a Corningware casserole dish so that loaf doesn't end up so flat.

  5. Take the preheated pot out of the oven and uncover the dough. Gently tip the dough into the pot, cover it, and put it into the oven. Bake covered for 30 minutes, then remove the lid and bake uncovered for 15-30 minutes more until the top is a deep brown. (I think I could have left my bread in a bit longer; it was golden brown on top, but a bit underdone.)
  6. Let the bread cool before slicing.

Friday, June 21, 2013

Our Daily Bread

There was a time in my life, when I was very young, that I regularly made bread. Mom had an old 50's booklet from Fleischman Yeast called "When you bake with yeast" from which I learned the basics. But I was inspired to do more by a couple of visiting Quakers who used bread making as a focus activity for some kind of spiritual discussion. I no longer remember the discussions or context, but it was from Helen Stevenson that I learned about the sponge method and how flexible and forgiving bread dough can be. So in my student days, I often made Helen's bread.

The years passed, and I stopped baking bread, but I recently started again in response to a crie de coeur from my aunt. She was complaining about the disappointing quality of a regular loaf of bread (yes, even in Europe!). She doesn't have a bakery close by, so she buys it in the supermarket and although it's better than much North American bread, it is still pretty soft and squishy, and lacking in depth of flavour. And of course, there are specialty breads and some really good bakeries, but for your regular sandwich bread that needs to stay relatively fresh and tasty for several days, there is still nothing like a home-made loaf.

So I started baking bread again.
I vary the types of flour quite a bit, depending on what I have on hand, but the following recipe is becoming a reliable standard. It yields a springy sandwich bread with a medium crumb that keeps well for 3-5 days outside of the fridge. The rolled oats temper the whole wheat flavour, yielding a mellow loaf with a hint of sweetness that goes well with everything from aged Gouda cheese to cream cheese and strawberries.

All my old recipes call for using warm water, scalding and cooling the milk, and letting the dough rise in a warm place. This will reduce the time it takes the dough to rise, but it also reduces the time for flavour to develop so I just use room temperature water and milk out of the fridge. Except for the last rise, I actually pay little attention to whether I've let the dough rise for an hour, or twice that time. Rising time is very flexible and you can do other stuff or run errands in the mean time. If you think you'll be out for a long time, put the dough in the fridge to slow down the rising time.

Barbara's Sandwich Bread

Yield: 2 loaves
I use a mixer with dough hook to do most of the kneading, but if you don't have this, you can knead the dough by hand. It's what I used to do.

Sponge:
375 ml1.5 cupwater
2 tablespoons   brown sugar
7 grams2.5 teaspoonsyeast (active dry yeast or instant yeast)
60 grams   .5 cupall-purpose flour
70 grams.5 cupwhole wheat flour
90 grams1 cuprolled oats *

Dough:
250 ml1 cupmilk
45 ml3 tablespoons    oil
2 tablespoonsbrown sugar
1 tablespoonsalt
120 grams1 cupall-purpose flour
435 grams3 cupswhole wheat flour

* I use quick rolled oats, which are cut, rather than old-fashioned rolled oats, which have larger flakes.
** Or substitute one or more other flours for some of the whole wheat flour. I've used spelt, rye, barley, and buckwheat in one or more combinations, and the result has always been good.
  1. If you are using active dry yeast, combine the water and sugar in the bowl of a mixer. Sprinkle the yeast over the water and let stand for 10 minutes until the yeast foams up. (If this doesn't happen, the yeast is old and inactive and you will have to get some new yeast and start again.) Add the flour and rolled oats.

    If you are using instant yeast, just mix all the sponge ingredients together.
  2. Beat the sponge ingredients together until smooth. I use the paddle of the mixer for about 2 minutes, but a wooden spoon is also fine. You just need to do it for a bit longer.
  3. Cover the bowl with a tea towel and let stand for about an hour until the batter has at least doubled in bulk and has large bubbles on top.
  4. Stir in the milk, oil, sugar, and salt.
  5. Add the 4 cups of flour, and knead the dough for 6-10 minutes using the dough hook. I tend to knead it for 6 minutes with the machine and then knead it by hand for a few minutes to make sure it has the right texture and feel.

    To knead by hand, tip the dough onto an oiled surface and flour your hands. Stretch the dough, away from you, then fold it over toward you, and push it away with the heal of your hand. Turn the dough by a quarter and repeat. Gradually the dough will get stretchy and supple, until it has a relatively smooth but slightly tacky feel. It should spring back when you push a finger into it and should not stick and leave pieces of dough on the counter when you lift it up.
  6. Form the dough into a ball, return it to the bowl and cover with a tea towel. Let stand for at least an hour or until doubled in bulk. While the dough rises, grease two loaf pans.
  7. Punch the dough down and turn it out onto the counter. Divide it into two. Form each half into a rectangle that is approximately the length of your loaf pan. Fold the top edge into the middle, and then the bottom edge into the middle like a letter. Then turn each end over. Shape the loaf so that it will fit the baking tin and place it into the tin. (I usually divide the dough into 4 pieces, and form each quarter into a ball, then place two balls into each tin, but this is cosmetic; I just do it because it makes it easy to cut the baked bread in half  so that I can freeze it.)
  8. Cover the loaves loosely with a tea towel and let rise for at least a half hour until the dough domes above the tin by a small amount (about 1 cm). While the loaves rise, preheat the oven to 350F/190C.
  9. Bake the bread for 35 to 40 minutes. It should come out of the tin quite easily, and sound hollow when you tap the bottom. If it doesn't, bake it for a bit longer.